Repairing old furniture

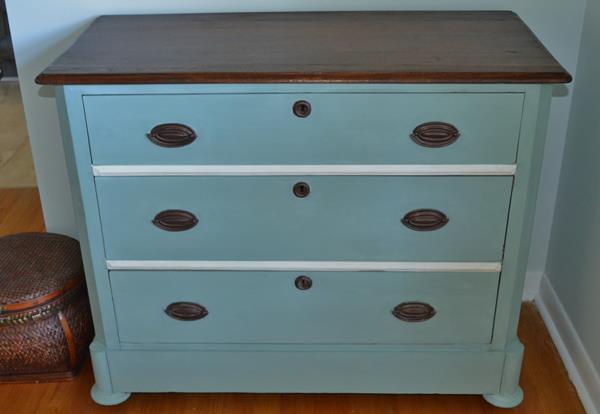
Most of the furniture I paint would be called vintage as it was built within the last 50 years.  Some of these pieces have needed  a bit of work on sticky drawers or may have needed some wood filler in places, but I try to buy things that don’t have problematic issues.  However, every now and then I purchase something older than vintage and inevitably there are things that aren’t quite right.  My latest find was actually a garbage day  pick-up-I’m not sure I would have bought it given the number of things wrong with it.  As an aside, I cannot get over the fact that people put things out for the garbage or for pickers like me, rather than donating them to a charity.  But back to the dresser:  it is solid mahogany but it had dents all over like someone took a hammer to it, the bottom drawer had been reinforced but it was missing the slider on one side, the handles were newer and had been screwed in with glue so they were impossible to remove, there was a large hole in the back and the drawers had an old wood smell.DSC_0017(3)DSC_0015(3)

It does have a nice classic shape, the feet conceal casters and it has large round keyholes.  The first thing that I did was put a coat of shellac inside and out of the drawers.  Smell is the thing that I find hardest to fix in old wood and shellac is the best thing for blocking odours.  My husband patched the hole in the back and put a new runner on the drawer.  I filled the dents with wood filler but some of them still show a bit.  I refinished the top but encountered an odd problem there.  There were small spots that were lighter than the rest of the wood and resisted the Danish oil that I applied. I have seen this once before and still have not learned why this happens even after it has gone through a lot of sanding.  I applied 3 coats of Danish oil and dabbed Annie Sloan Graphite on the spots to make them blend in more.  If I were keeping the dresser for myself I would have stopped there but since I am selling it, I know that most people are not used to having a surface that isn’t completely water-resistant.  So, I used Circa 1850 Paste Varnish which is a gel and gives a hand-rubbed look but is actually concentrated poly.

I painted the body in Annie Sloan Duck Egg which is a very popular colour but this is the first time that  I have actually used it.  The trim and the inside of the drawers are painted in Old White.  The handles and keyholes were painted then covered in copper gilding paste.  Now that it is finished,  I think that the cool blue/green and the mahogany give the chest an elegant look that is suitable to its style.

DSC_0003(21)DSC_0001 (1)(1)DSC_0002(32)

http://www.lifeonlakeshoredrive.com/2014/09/the-bouquet-of-talent-linky-party-107.html
http://www.findingsilverpennies.com/2014/09/silver-pennies-sundays-link-party-features-87.html
http://www.settingforfour.com/2014/09/diy-makeovers-recipes.html
http://www.thededicatedhouse.com/
http://elizabethandco.blogspot.ca/
http://linda-coastalcharm.blogspot.ca/

Decor Ideas with Beautiful Patterns and Colors – FDTR #136


http://www.greenwillowpond.com/
http://sweethaute.blogspot.ca/
http://bloomdesignsonline.com/2014/09/link-party-86.html
http://www.redouxinteriors.com/2014/09/best-diy-link-party-handmade-hangout-week-15/
http://missmustardseed.com/
http://www.thehankfulhouse.com/2014/11/get-your-diy-on-furniture-revivals.html

How to apply danish oil

DSC_0001(26)

Danish oil is an air-drying oil that is a mixture of linseed oil and varnish. There are many brands on the market and they may have different combinations in them but they all essentially work the same way. It is called danish oil because it was developed for mid-century Scandinavian style furniture to provide protection but low sheen. Danish oil penetrates the wood, unlike stain or poly which are called film finishes, but it also hardens as it dries and therefore, provides much more protection than a regular oil like hemp. It is a forgiving finish both in application and long-term use. Unlike film finishes, you don’t get streaking when you are applying it and it is easy to re-apply over time, should you get a mark or area that shows wear.
This is my pine dining set with a danish oil finish; I have written earlier about it here:

Pine table with Pure White

Pine table with Pure White

I have a strong bias against poly finishes but I do use them because I recognize that nothing is as forgiving for water stains.  Our house has furniture from different time periods.  We have some antiques and vintage 1930’s-40’s  items that we inherited.  All of the newer pieces like our coffee table were bought in the early 80’s.  The coffee table which is mahogany and made by Gibbard , a well-known Canadian manufacturer, as well as the pine dining set, had a polyurethane finish.  We have always been careful with the older furniture; if you get a water mark, the best thing to do is to take a walnut or an almond and rub it into the stain.  The oil will bring some of the colour to the surface and disguise the mark.  Perfume also works in a similar way if the furniture has a French Polish.  The alcohol in the perfume dissolves the shellac a bit and evens out the mark.  We never had to worry about wet marks on  the poly covered pieces but they had their own problems.  Both tables had an unbelievable number of scratches in the poly that you could see in certain lights.  As well, over time the surfaces got areas where the poly had filmed and created a whitish discoloration.  Unlike with the older furniture, these problems cannot be remedied without completely stripping the surface.   That is why, I prefer danish oil because if you do get a mark, you can use steel wool on it and apply more oil.

How to apply it:   The surface must be bare and sanded with different grades of sand paper.  Flood the surface with the oil, work with the grain and wipe it in.  Let it sit for about 30 minutes, then wipe the excess off, if there is any.  Let it dry overnight, then repeat the process, but wipe it after 15 minutes.  Two coats is sufficient but you can put on subsequent coats if you want to build a bit more shine.  It should always be dry to the touch before you apply more coats. Sanding lightly with 0000 grade steel wool before applying another coat will open the pores and allow for more penetration.  You can apply a coat of wax when you are finished if you wish to provide more sheen and protection or you could put a coat of poly on top, if you really want waterproofing but that seems to somewhat defeat the purpose.

Danish oil comes natural or tinted with stain.  The natural one will bring the colour of the wood to the surface depending on what type of wood you are working with.    I used mahogany tinted Watco Danish oil on the coffee table but regretted it because it came out bright red.  I  then applied subsequent coats of walnut tinted oil to the surface to tone it down.  The table has quite a sheen because it had so many coats applied to it.  The downside to that , is that it took forever to completely dry.  I did apply a coat of wax to the finished surface.  The base of the table was painted in Annie Sloan Old Ochre.

It may seem to be more work than stain and poly which I have used a lot but I am much happier with the results.  It creates a natural looking, hand-rubbed surface that is water-resistant and there are no streaks.

DSC_0003(19)DSC_0004(27)DSC_0005(14)

DSC_0002(29)


http://www.thededicatedhouse.com/
http://linda-coastalcharm.blogspot.ca/
http://elizabethandco.blogspot.ca/
http://www.hopestudios.blogspot.ca/
http://thediydreamer.com/from-dream-to-reality/delicious-pumpkin-desserts-135/
http://satoridesignforliving.com/2014/09/be-awesome-link-party-13/
http://sweethaute.blogspot.ca/
http://www.redouxinteriors.com/2014/09/best-diy-link-party-handmade-hangout/
http://missmustardseed.com/2014/09/furniture-feature-friday-favorites-link-party-38/
http://chiconashoestringdecorating.blogspot.ca/
http://shabbynest.blogspot.ca/2014/09/frugal-friday_18.html
http://what-about.co/show-friday-118/#
http://www.lifeonlakeshoredrive.com/2014/09/the-bouquet-of-talent-linky-party-107.html
http://www.findingsilverpennies.com/2014/09/silver-pennies-sundays-link-party-features-87.html